

How does a motor change electrical energy into motion? An electric current produces a magnetic field. This magnetic field can be attracted to or repelled by a permanent magnet. This attraction or repulsion can cause movement in a wire that carries an electric current.
You will need the following materials:
1 meter (3 feet) of 22-gauge or 24-gauge solid-core insulated wire
e.g. Radio Shack catalog # 278-1215
2 disk magnets
e.g. Radio Shack Catalog # 64-1888
2 insulated test cables with a clip on each end
e.g. Radio Shack catalog # 278-1157
(2 pieces of above insulated wire can also be used)
a plastic cup
two large rubber bands
two jumbo size (2-inch) paper clips
D-cell battery
wire strippers
waterproof marking pen
optional holder for D-cell
e.g. Radio Shack catalog # 270-403
Take the 3-foot piece of insulated wire. Starting about 3 inches from the end of the wire, wrap it seven times around the D-cell battery to form a coil. Wrap the ends of the wire a couple of times around the coil to hold it together.
Use the wire strippers to remove the insulation from the two ends of the coil.
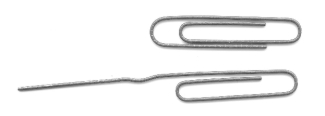
Straighten the larger loops of two paper clips.
Turn the cup upside down and place a magnet on top in the center. Attach another magnet inside the cup, directly beneath the original magnet. This will create a stronger magnetic field as well as hold the top magnet in place.
Put two large rubber bands around the base of the cup.
Insert the straightened paper clips into the rubber bands, so they stand upright over the bottom of the cup.
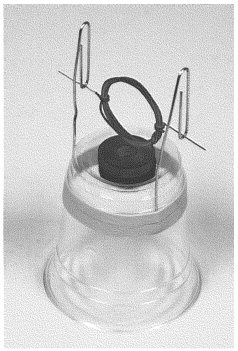
Rest the ends of the coil in the cradles formed by the paper clips. Adjust the height of the paper clips so that when the coil spins, it just clears the magnets. Adjust the coil and the clips until the coil stays balanced and centered while spinning freely on the clips. Good balance is important in getting the motor to operate well.
Once you have determined how long the projecting ends of the coil must be to rest in the paper-clip cradles, you may trim off any excess wire.
Attach one of the clip cables to each paper clip just above the rubber bands. You may need to readjust the clips to make sure the coil still spins freely.
Hold the other ends of the clip leads against the two poles of the D-cell battery. If the coil is well balanced on the clips, it will rotate to a near horizontal position. The magnetic field created by the electric current in the coil aligns itself with the magnets.
The coil may not continue to turn, because the current continues to flow through the coil its magnetic fields stays aligned with the magnets. To get the coil to continue rotating, the current should be turned off when the coil is aligned with the magnets. This can be done by coating part of one of the bare wire ends of the coil.
Remove the coil from the paper clips. Hold the coil vertically. Use the permanent marker to paint the TOP HALF of one of the two end wires. Allow the ink to dry for a few seconds, and apply a second coat. Allow several second again for the ink to dry, and then hang the coil on the paper clips again.
Connect the D-cell battery again, and give the coil a gentle spin. If it doesn't keep spinning on its own, check to make sure that the coil assembly is well balanced when spinning, that the projecting end has been painted with black pen as noted, and that the coil and the magnet are close to each other but do not hit each other. You might also try adjusting the distance separating the cradles: This may affect the quality of the contact between the coil and the cradles. With a little adjustment, your motor will spin rapidly when connected to the battery. (A holder for the battery will allow you to make the connections without holding them in place.)